
(Created page with "This is a guide for using the 'Account' tab on the Server (server.exe). For a guide on creating an account in game, please use Account Creation ==Basic Information== Acco...") |
m |
||
| Line 14: | Line 14: | ||
! colspan="2" | Accounts Screen | ! colspan="2" | Accounts Screen | ||
|- | |- | ||
| − | ! colspan="2" | | + | ! colspan="2" | https://www.lomcn.org/wiki/images/mir2/server-account.jpg |
|- | |- | ||
! style="font-weight: bold;" | Reference | ! style="font-weight: bold;" | Reference | ||
Latest revision as of 15:01, 21 May 2021
This is a guide for using the 'Account' tab on the Server (server.exe). For a guide on creating an account in game, please use Account Creation
Basic Information
Account options can be found after running the server.exe and clicking on the account tab located near the top of the server window. In this section you can
- Create new accounts
- Manage current account (including deleting)
- Ban users (for any amount of time) and give a reason
Available Options
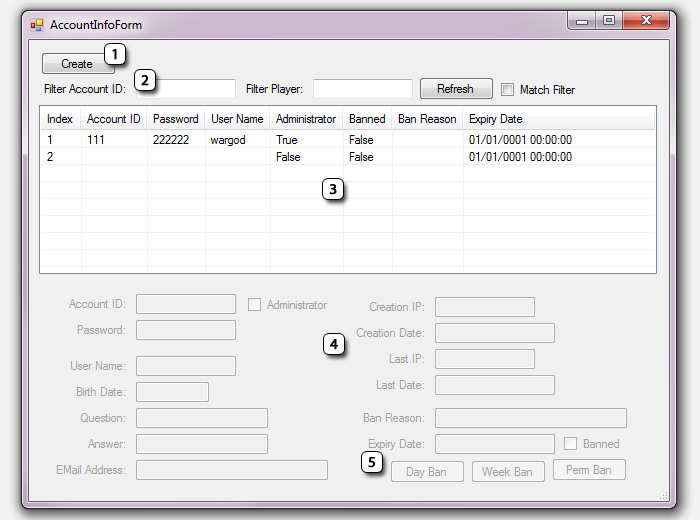
| Accounts Screen | |
|---|---|
| |
| Reference | Description |
| 1 | You can create accounts yourself within the server, as opposed to doing so through the ingame create account options. Note: Clicking on this adds a new account to section 3 and you then click on it to edit the settings. The settings are edited in the bottom half of the screen. |
| 2 | A quick filter for account finding. Account ID is the login username, player is by character name. Refresh starts the search, and match filter when ticked means it will provide only results that match exactly (if ticked, searching for WarGod would NOT provide results for wargod for example, only LITERAL matches) |
| 3 | This is the overview of accounts in your server. Filter results will appear here, and you can click on an account line to highlight it. Highlighting it brings up the account specific in the bottom half of the screen (section 4). Nothing can be edited here, its only a preview of account and a means of 'selecting' it |
| 4 | The main section, and where all account settings are edited/created.
|
| 5 | The ban section. Note that the button dont open anything, just add time to the expiry.
|