
| (45 intermediate revisions by the same user not shown) | |||
| Line 1: | Line 1: | ||
| − | + | <big>Getting Started - Build Guide</big> | |
| − | |||
| − | + | Description: | |
| − | |||
| − | |||
| − | |||
| − | + | With the updates Crystal Source code has been receiving, the Guide's for building the source and compiling them have become outdated which has led to a lot of confusion and help being requested. | |
| − | + | This guide will be a complete step by step guide from downloading visual studio to launching into your server. | |
| − | |||
| − | + | Also make sure you download all the files within this repo - https://github.com/JevLOMCN/BlackScreenIssues | |
| + | ==Step 1== | ||
| + | ===Downloading Visual Studio 2022=== | ||
| − | + | Download VS Community 2022 using the following link - [https://visualstudio.microsoft.com/vs/community/ Visual Studio] | |
| − | + | Once VS is downloaded, Open it up and download the following WorkLoads: | |
| − | |||
| − | + | https://www.lomcn.net/wiki/images/4/4a/1.png | |
| − | + | https://www.lomcn.net/wiki/images/f/fb/2.png | |
| − | + | If you can't find this window head over to Tools > Get Tools and Features | |
| − | |||
| − | |||
| − | |||
| − | |||
| − | + | https://www.lomcn.net/wiki/images/0/09/4.png | |
| − | |||
| − | |||
| − | |||
| − | |||
| − | == | + | Select Individual Components and Select .Net 8.0 Runtime |
| + | |||
| + | https://www.lomcn.net/wiki/images/8/82/5.png | ||
| + | |||
| + | ==Step 2== | ||
| + | ===Downloading the Latest Source Code=== | ||
| + | |||
| + | Head over to [https://github.com/Suprcode/mir2 github.com/Suprcode/mir2] | ||
| + | |||
| + | https://www.lomcn.net/wiki/images/f/f1/6.png | ||
| + | |||
| + | |||
| + | Once this is downloaded head over to your Desktop and create a new folder called Crystal Mir 2. | ||
| + | |||
| + | Open up your mir2master.zip from your downloads folder and drag the folder into the Crystal Mir 2 folder located on your desktop. | ||
| + | |||
| + | https://www.lomcn.net/wiki/images/9/9e/7.png | ||
| + | |||
| + | ==Step 3== | ||
| + | ===Building the code=== | ||
| + | |||
| + | Open up Legend of Mir.sln located in your Crystal Mir 2 > mir2-master | ||
| + | |||
| + | |||
| + | |||
| + | Right click Solution 'Legend of Mir' (9 of 9 projects) | ||
| + | |||
| + | https://www.lomcn.net/wiki/images/6/60/8.png | ||
| + | |||
| + | Click Build Solution | ||
| + | |||
| + | https://www.lomcn.net/wiki/images/7/7a/9.png | ||
| + | |||
| + | Encounting this error? | ||
| + | |||
| + | https://www.lomcn.net/wiki/images/5/58/10.png | ||
| + | |||
| + | If so head over to [https://www.lomcn.net/forum/threads/visual-studio-couldnt-process-file-fix.109906/ Visual Studio Couldn't process file fix] to fix these errors, Then repeat Step 3. | ||
| + | |||
| + | ==Step 4== | ||
| + | ===Creating the folders we need=== | ||
| + | |||
| + | Open Crystal Mir 2 Folder and create the following empty directories. | ||
| + | |||
| + | https://www.lomcn.net/wiki/images/5/59/11.png | ||
| + | |||
| + | Now open your mir2-master folder and open the Build Folder. | ||
| + | |||
| + | https://www.lomcn.net/wiki/images/9/9e/12.png | ||
| + | |||
| + | You should now see these three directories: | ||
| + | |||
| + | https://www.lomcn.net/wiki/images/c/c0/13.png | ||
| + | |||
| + | Open the Client folder then open the Debug folder. | ||
| + | |||
| + | Copy all of these files into your Client folder located in Crystal Mir 2 > Client | ||
| + | |||
| + | https://www.lomcn.net/wiki/images/7/7b/14.png | ||
| + | |||
| + | Repeat this with the Server Folder located in the Build folder, copy all those files into the Crystal Mir 2's Server folder. | ||
| + | |||
| + | https://www.lomcn.net/wiki/images/d/d6/15.png | ||
| + | |||
| + | ==Step 5== | ||
| + | ===Patching the Client=== | ||
| + | |||
| + | Open your Client folder that's located in Crystal Mir 2 (Not the build folder) | ||
| + | |||
| + | Now open the Client.exe | ||
| + | |||
| + | https://www.lomcn.net/wiki/images/1/1e/16.png | ||
| + | |||
| + | This will now open the Client which will download all the required base files for your client. | ||
| + | |||
| + | ==Step 6== | ||
| + | ===Starting the server=== | ||
| + | |||
| + | Open your server.exe in Crystal Mir 2 > Server (Not the build folder) | ||
| + | |||
| + | https://www.lomcn.net/wiki/images/c/c9/17.png | ||
| + | |||
| + | This will now create all the required files for the Server. | ||
| + | |||
| + | You will now see the Server with the following error: | ||
| + | |||
| + | https://www.lomcn.net/wiki/images/8/88/18.png | ||
| + | |||
| + | * If you would like to Download a pre-made database, go straight to Step 7. | ||
| + | |||
| + | * If you would like to start your server with no database (Create your own) then close your server down and open Setup.ini located in Crystal Mir 2 > Server > Configs | ||
| + | |||
| + | https://www.lomcn.net/wiki/images/b/ba/19.png | ||
| + | |||
| + | Change EnforceDBChecks=True > EnforceDBChecks=False and ignore Step 7. (!!Downloading a database is highly recommended!!) | ||
| + | |||
| + | ==Step 7== | ||
| + | ===Downloading a Database=== | ||
| + | |||
| + | Head over to [https://github.com/Suprcode/mir2-database/releases Github Suprcode Database Releases] | ||
| + | |||
| + | Download the latest Release. | ||
| + | |||
| + | https://www.lomcn.net/wiki/images/0/07/20.png | ||
| + | |||
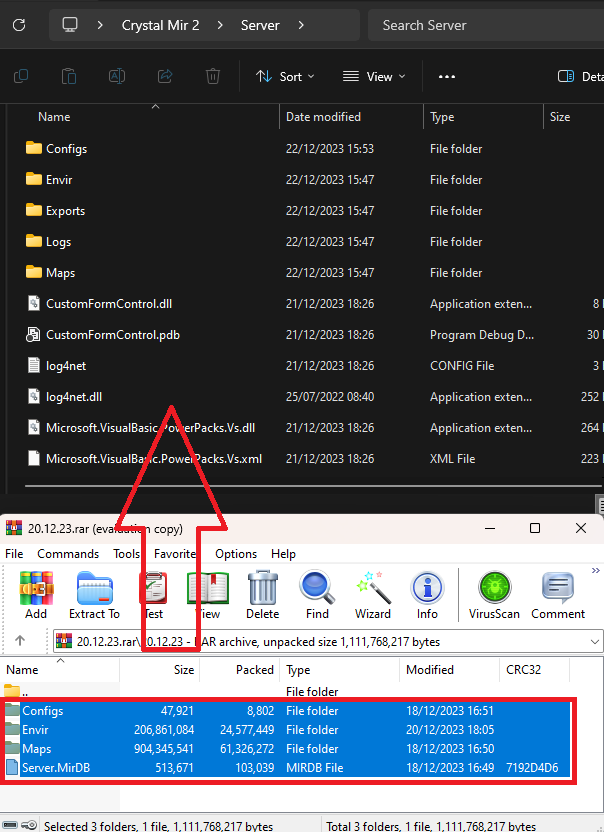
| + | Once downloaded Open the .rar and drag the files/folder into your Server folder inside Crystal Mir 2 Folder. | ||
| + | |||
| + | https://www.lomcn.net/wiki/images/7/71/21.png | ||
| + | |||
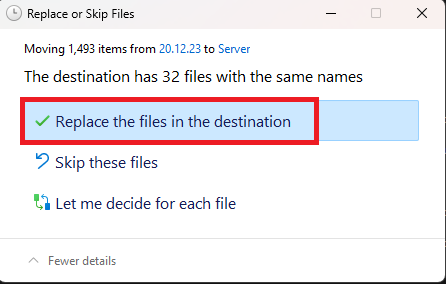
| + | Click 'Replace the files in the destination' | ||
| + | |||
| + | https://www.lomcn.net/wiki/images/7/75/22.png | ||
| + | |||
| + | Note: Copy over the maps from the Server's Map folder to the Client's Maps folder. | ||
| + | |||
| + | ==Step 8== | ||
| + | ===Getting Online=== | ||
| + | |||
| + | You have two options. Local Server or Ported Server. | ||
| + | |||
| + | If you want a Ported Server (Allow others to join) please follow the steps in the [https://www.lomcn.net/forum/threads/port-forwarding.106595/ Port Forwarding Tutorial] | ||
| + | |||
| + | Alternatively for a Local Server: | ||
| + | |||
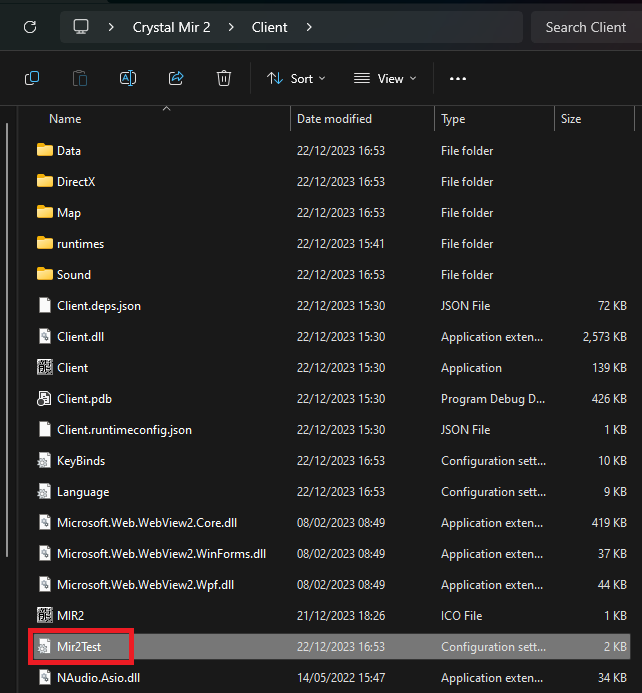
| + | Open your Client Folder and open Mir2Test.ini | ||
| + | |||
| + | https://www.lomcn.net/wiki/images/7/7a/23.png | ||
| + | |||
| + | Change | ||
| + | |||
| + | [Network] | ||
| + | |||
| + | UseConfig=False | ||
| + | |||
| + | |||
| + | To | ||
| + | |||
| + | |||
| + | [Network] | ||
| + | |||
| + | UseConfig=True | ||
| + | |||
| + | IPAddress=127.0.0.1 | ||
| + | |||
| + | Port=7000 | ||
| + | |||
| + | |||
| + | Note: For a local Server you do not need to adjust any Server IP as this is defaulted to 127.0.0.1 | ||
| + | |||
| + | Now Launch your Server and Client! | ||
| + | |||
| + | ==Step 9== | ||
| + | ===Admin account creation=== | ||
| + | |||
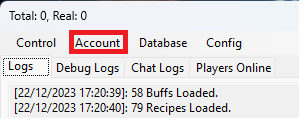
| + | When your server is fully loaded Press Account | ||
| + | |||
| + | https://www.lomcn.net/wiki/images/2/24/24.png | ||
| + | |||
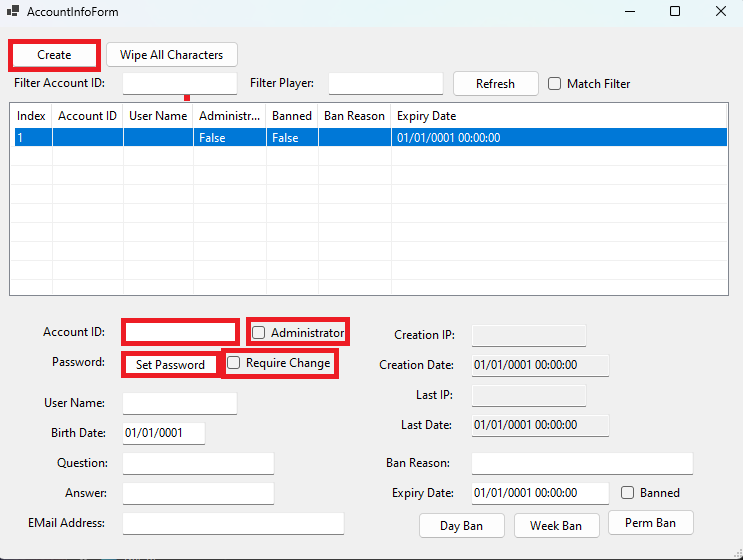
| + | Now Press Create | ||
| + | |||
| + | https://www.lomcn.net/wiki/images/a/a9/25.png | ||
| + | |||
| + | Give your account an ID | ||
| + | & | ||
| + | Set a password | ||
| + | |||
| + | Now Uncheck Require Change | ||
| + | & | ||
| + | Check Administrator | ||
Latest revision as of 15:49, 9 February 2024
Getting Started - Build Guide
Description:
With the updates Crystal Source code has been receiving, the Guide's for building the source and compiling them have become outdated which has led to a lot of confusion and help being requested.
This guide will be a complete step by step guide from downloading visual studio to launching into your server.
Also make sure you download all the files within this repo - https://github.com/JevLOMCN/BlackScreenIssues
Step 1
Downloading Visual Studio 2022
Download VS Community 2022 using the following link - Visual Studio
Once VS is downloaded, Open it up and download the following WorkLoads:
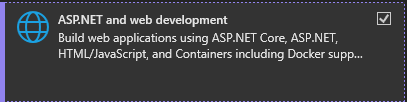
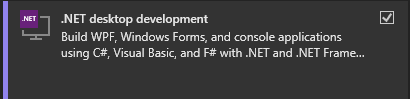
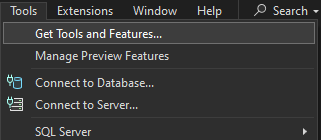
If you can't find this window head over to Tools > Get Tools and Features
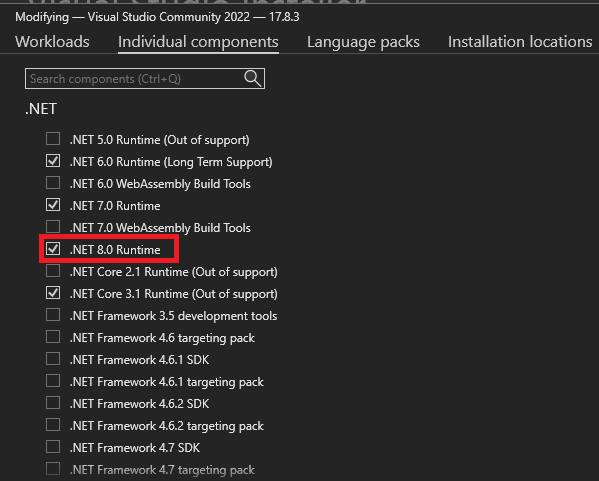
Select Individual Components and Select .Net 8.0 Runtime
Step 2
Downloading the Latest Source Code
Head over to github.com/Suprcode/mir2

Once this is downloaded head over to your Desktop and create a new folder called Crystal Mir 2.
Open up your mir2master.zip from your downloads folder and drag the folder into the Crystal Mir 2 folder located on your desktop.

Step 3
Building the code
Open up Legend of Mir.sln located in your Crystal Mir 2 > mir2-master
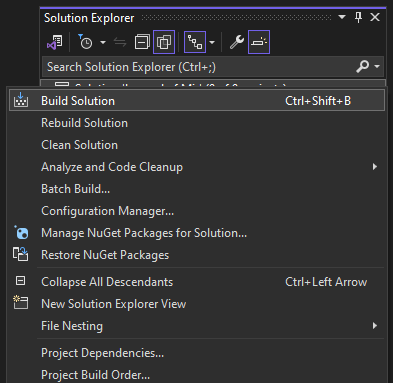
Right click Solution 'Legend of Mir' (9 of 9 projects)
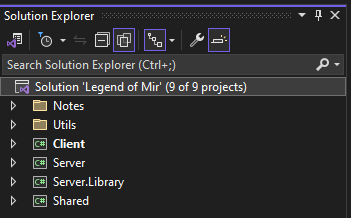
Click Build Solution
Encounting this error?

If so head over to Visual Studio Couldn't process file fix to fix these errors, Then repeat Step 3.
Step 4
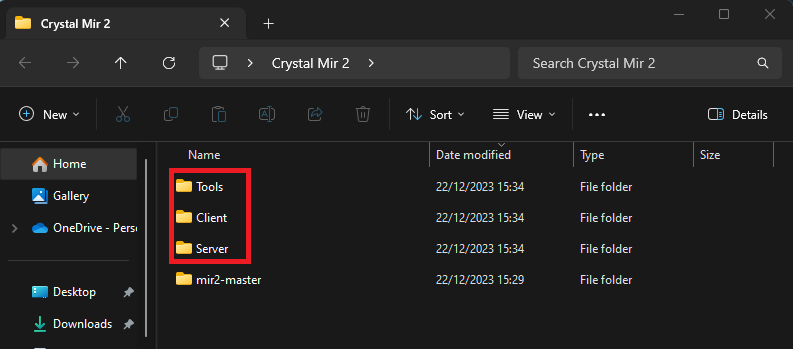
Creating the folders we need
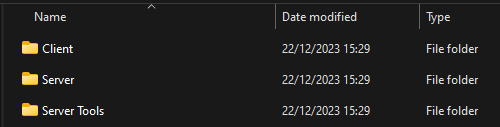
Open Crystal Mir 2 Folder and create the following empty directories.
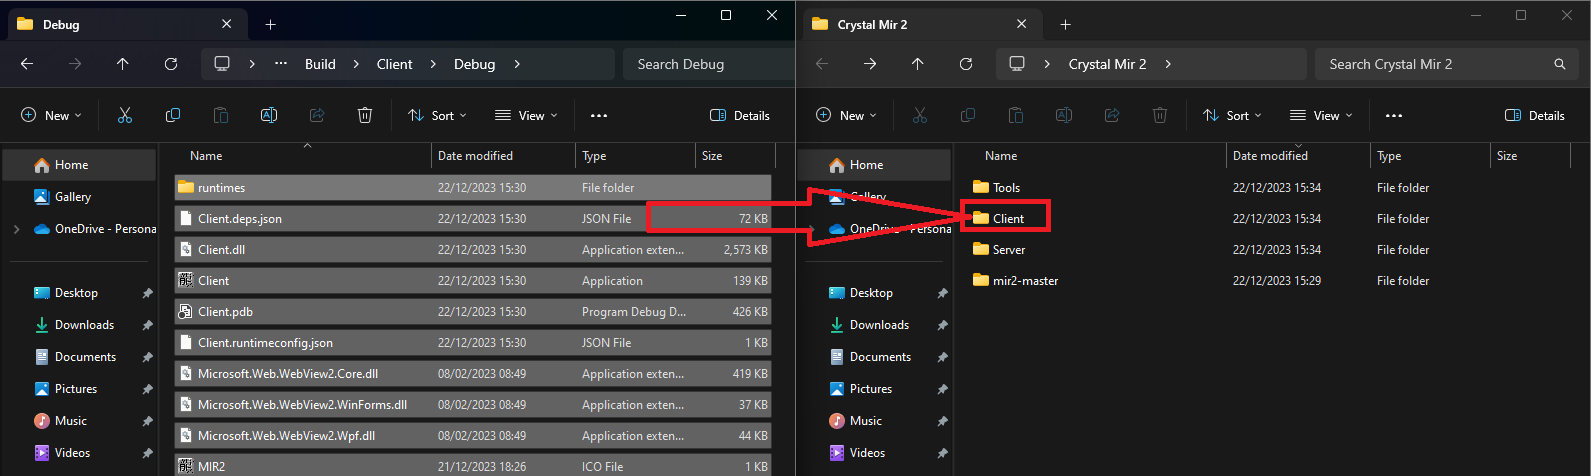
Now open your mir2-master folder and open the Build Folder.
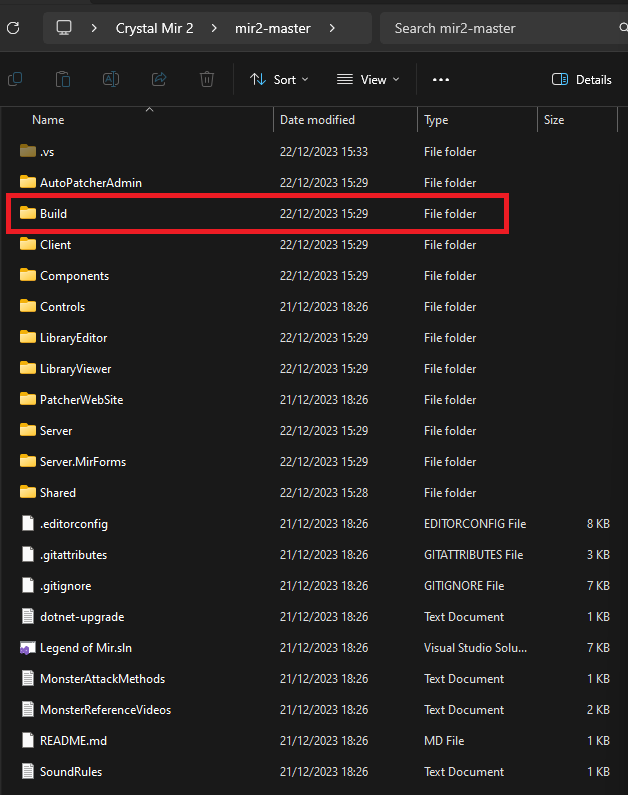
You should now see these three directories:
Open the Client folder then open the Debug folder.
Copy all of these files into your Client folder located in Crystal Mir 2 > Client
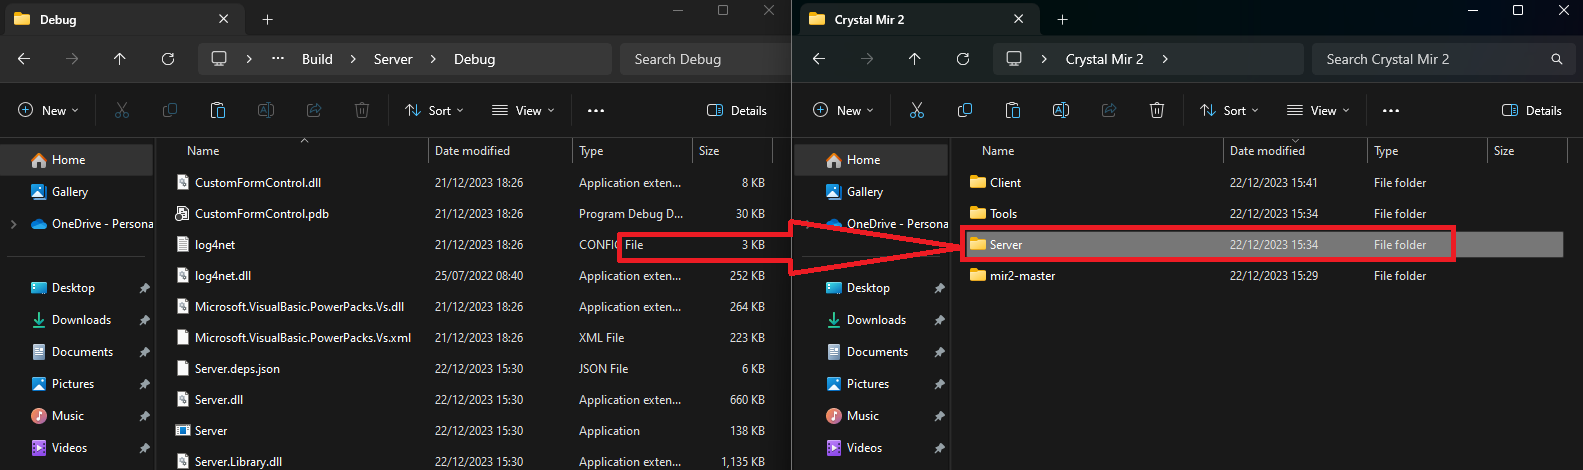
Repeat this with the Server Folder located in the Build folder, copy all those files into the Crystal Mir 2's Server folder.
Step 5
Patching the Client
Open your Client folder that's located in Crystal Mir 2 (Not the build folder)
Now open the Client.exe
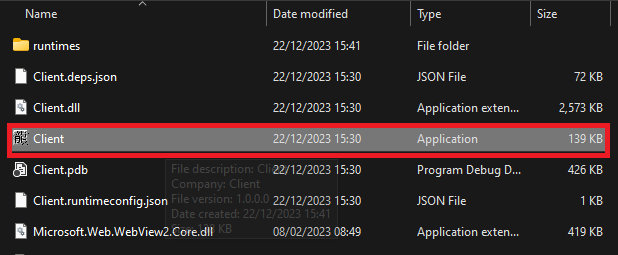
This will now open the Client which will download all the required base files for your client.
Step 6
Starting the server
Open your server.exe in Crystal Mir 2 > Server (Not the build folder)
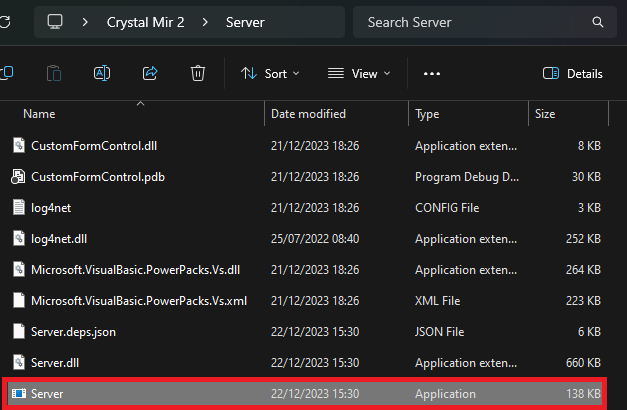
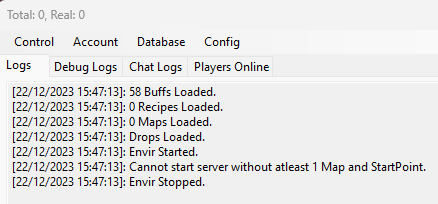
This will now create all the required files for the Server.
You will now see the Server with the following error:
- If you would like to Download a pre-made database, go straight to Step 7.
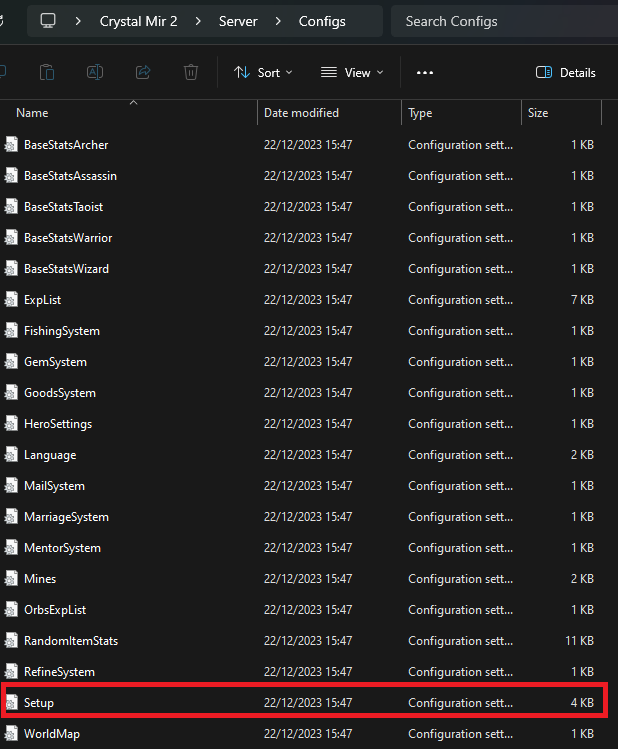
- If you would like to start your server with no database (Create your own) then close your server down and open Setup.ini located in Crystal Mir 2 > Server > Configs
Change EnforceDBChecks=True > EnforceDBChecks=False and ignore Step 7. (!!Downloading a database is highly recommended!!)
Step 7
Downloading a Database
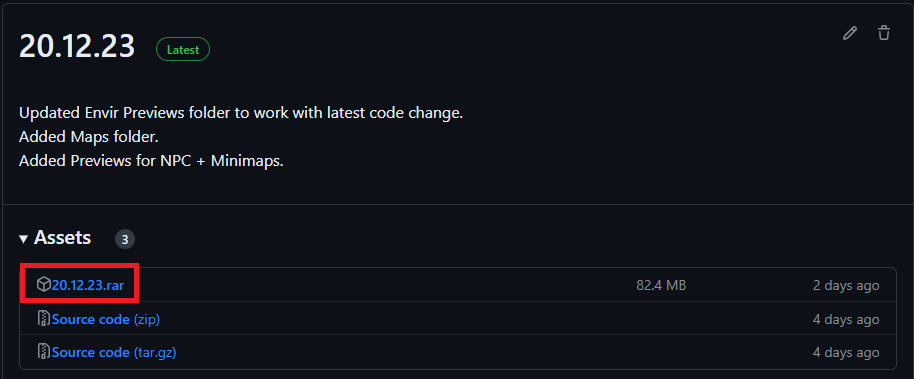
Head over to Github Suprcode Database Releases
Download the latest Release.
Once downloaded Open the .rar and drag the files/folder into your Server folder inside Crystal Mir 2 Folder.
Click 'Replace the files in the destination'
Note: Copy over the maps from the Server's Map folder to the Client's Maps folder.
Step 8
Getting Online
You have two options. Local Server or Ported Server.
If you want a Ported Server (Allow others to join) please follow the steps in the Port Forwarding Tutorial
Alternatively for a Local Server:
Open your Client Folder and open Mir2Test.ini
Change
[Network]
UseConfig=False
To
[Network]
UseConfig=True
IPAddress=127.0.0.1
Port=7000
Note: For a local Server you do not need to adjust any Server IP as this is defaulted to 127.0.0.1
Now Launch your Server and Client!
Step 9
Admin account creation
When your server is fully loaded Press Account
Now Press Create
Give your account an ID & Set a password
Now Uncheck Require Change & Check Administrator